Tuesday, August 13, 2013
Tabistry Domed Hat Tutorial is now available on Etsy
Working on getting tutorial edited and converted to Etsy's "Instant Digital Download" feature. I've separated out some of the hat patterns to simplify things. This is a set of domed or rounded topped hats. I'll have the flat-topped and open-topped tutorials available shortly. And, now all the steps and techniques necessary are included in the files. No need to buy the Basics with my tutorials now. I did this to eliminate some confusion that had occurred during the old way.
You can find it here:
https://www.etsy.com/listing/159573974/tabistry-pop-top-domed-hat-pdf-tutorial
Thanks for the patience!
Labels:
announcement,
hat,
tutorial
Saturday, May 11, 2013
Corset Pattern Finally Available!
I know I've been promising a corset tutorial for a really, REALLY long time. I feel bad making those who have requested it wait so long. I just want them to be as clear as I can get them, so there isn't any frustration. Well, good news! I've got one finally available on Etsy!

This is the pattern for my Gusseted Corset. It is much simpler to fit/alter than the other paneled ones. Besides being a wee more complicate to weave, it really is easier to get a good fit. Just know that it will set you back about 2000 tabs. That's close to a half of a gallon worth.

I'm so happy that Etsy is now offering "Instant Digital Downloads". No more waiting for me to setup and send file links after transaction. You ge the files as soon as payment is complete. So, that means I also won't have to watch my inbox 24/7. Though, I probably will anyway. :) So, anyone who tries the instant dl, let me know how your experience goes. If I need to switch it back to manual, I'm happy to do so. YOu can find the corset pattern at :
https://www.etsy.com/listing/150885162/tabistry-gusseted-corset-pattern-and
I do still plan to make the paneled corset patterns available to those who want them, but I'm still fussing with the alteration instructions. I also have plans for including a pattern for a simple waist cincher. Look for that to be available soon. (And, this time I MEAN very soon.) :)

This is the pattern for my Gusseted Corset. It is much simpler to fit/alter than the other paneled ones. Besides being a wee more complicate to weave, it really is easier to get a good fit. Just know that it will set you back about 2000 tabs. That's close to a half of a gallon worth.

I'm so happy that Etsy is now offering "Instant Digital Downloads". No more waiting for me to setup and send file links after transaction. You ge the files as soon as payment is complete. So, that means I also won't have to watch my inbox 24/7. Though, I probably will anyway. :) So, anyone who tries the instant dl, let me know how your experience goes. If I need to switch it back to manual, I'm happy to do so. YOu can find the corset pattern at :
https://www.etsy.com/listing/150885162/tabistry-gusseted-corset-pattern-and
I do still plan to make the paneled corset patterns available to those who want them, but I'm still fussing with the alteration instructions. I also have plans for including a pattern for a simple waist cincher. Look for that to be available soon. (And, this time I MEAN very soon.) :)
Labels:
clothing,
corset/bodice,
tutorial
Tuesday, April 16, 2013
Stay Tab Tabbed Stays!* ;)
I've made revisions to these stays. Go here to see the results.
****************UPDATED*****************
Say that five times fast! Haha! (Oh dear. Is my geek showing?!)

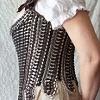
Been working on a new Corset/Bodice design. This one is inspired by the triangular-shaped Rococo, or late Baroque style Bodices from the 18th century. It has straps and "tabs" all around the bottom edge.

While I was writing up the corset tutorial, I realized I was missing this important style that I'd really wanted to attempt. So, conveniently, I decided to remedy this just in time for faire last weekend. :) I still have some changes I would like to make to it.

For one, I started adding a "V" pattern about a third of the way up. I need to fix the lower portion, and I want to make the front longer anyway. And, I'd like to change the back and make the straps permanently attached there. I'm also thinking of adding something like "waist tape" to strengthen the waist of the corset and maybe some "stays", or a busk in front.
* If the title of this post has confused you, I'll explain. If it wasn't ironic enough to have a tabbed corset made of tabs, you might be interested in another nerdy bit. These corsets were once referred to as "stays" (used plural) due to the boning. AND, the modern type of can tab I used are referred to as "stay tabs" because they stay on the can unlike the older "zip tops". So, technically these would be Tabbed Stays made with Stay Tabs! :) I'll post this corset again when I get the changes made. But, hopefully not before the corset tutorial is finished and up. Until then, be can-TAB-ulous!!
****************UPDATED*****************
Say that five times fast! Haha! (Oh dear. Is my geek showing?!)

Been working on a new Corset/Bodice design. This one is inspired by the triangular-shaped Rococo, or late Baroque style Bodices from the 18th century. It has straps and "tabs" all around the bottom edge.

While I was writing up the corset tutorial, I realized I was missing this important style that I'd really wanted to attempt. So, conveniently, I decided to remedy this just in time for faire last weekend. :) I still have some changes I would like to make to it.

For one, I started adding a "V" pattern about a third of the way up. I need to fix the lower portion, and I want to make the front longer anyway. And, I'd like to change the back and make the straps permanently attached there. I'm also thinking of adding something like "waist tape" to strengthen the waist of the corset and maybe some "stays", or a busk in front.
* If the title of this post has confused you, I'll explain. If it wasn't ironic enough to have a tabbed corset made of tabs, you might be interested in another nerdy bit. These corsets were once referred to as "stays" (used plural) due to the boning. AND, the modern type of can tab I used are referred to as "stay tabs" because they stay on the can unlike the older "zip tops". So, technically these would be Tabbed Stays made with Stay Tabs! :) I'll post this corset again when I get the changes made. But, hopefully not before the corset tutorial is finished and up. Until then, be can-TAB-ulous!!
Labels:
clothing,
corset/bodice,
costume
Friday, March 29, 2013
A tisket..a tasket...I made a pretty basket!! :D
I managed to make the daughter an Easter basket this year. It took me a couple days to construct. I normally like to buy the baskets 2nd hand. You can usually get a nicer basket than what's available new in the stores around here. And, they are pretty easy to paint and spruce up. We also reuse the grass and any plastic eggs we get from school and such. But, this year I decided to make her a basket with can tabs.

I've been wanting to make a tabistry basket for a looong time, but just never got around to it til now. This basket is supposed to look like a flower with petals for sides. (Didn't make the bunny, and had to use plain plastic eggs I found in the daughters room.) The basket is pretty small at about 9 inches tall and 7 inches wide.

I used polar fleece on the entire basket using a similar weave to the last corset I posted for the sides. I think ribbon would probably be a better choice for this type of project. Is kinda odd to have a fuzzy basket. :)

The yellow bottom was an attempt to make the center of a flower like a daisy. And, I was inspired on the handle by jewelry items one of our tabistry group member had posted in our facebook group. It's worked really well for a nice sturdy narrow handle.

I tied a small flower, which is based on my favors, on the handle that I made from the scraps for polar fleece.

I wrapped the darker pink around the end tabs to cover them. I'm liking how it turned out softer than other edge treatments I've tried. I think I might make some more of the flowers at a later date. They's be cute on a headband or something.

If I had more time, I'd make some other sizes of basket. There are so many ideas to try. Just wish I could get things done faster. But, alas, I must keep reminding myself I'm only human and have limits. :(
On other projects, I'm still plugging away on the corset tutorial. I've got some new pics that should work better, but I'd like to get a few more. And, I've been a bad girl and started another corset that I'd like to get finished. And, want to rework a couple other projects that I've put off.
Have a Happy Easter!

I've been wanting to make a tabistry basket for a looong time, but just never got around to it til now. This basket is supposed to look like a flower with petals for sides. (Didn't make the bunny, and had to use plain plastic eggs I found in the daughters room.) The basket is pretty small at about 9 inches tall and 7 inches wide.

I used polar fleece on the entire basket using a similar weave to the last corset I posted for the sides. I think ribbon would probably be a better choice for this type of project. Is kinda odd to have a fuzzy basket. :)

The yellow bottom was an attempt to make the center of a flower like a daisy. And, I was inspired on the handle by jewelry items one of our tabistry group member had posted in our facebook group. It's worked really well for a nice sturdy narrow handle.

I tied a small flower, which is based on my favors, on the handle that I made from the scraps for polar fleece.

I wrapped the darker pink around the end tabs to cover them. I'm liking how it turned out softer than other edge treatments I've tried. I think I might make some more of the flowers at a later date. They's be cute on a headband or something.

If I had more time, I'd make some other sizes of basket. There are so many ideas to try. Just wish I could get things done faster. But, alas, I must keep reminding myself I'm only human and have limits. :(
On other projects, I'm still plugging away on the corset tutorial. I've got some new pics that should work better, but I'd like to get a few more. And, I've been a bad girl and started another corset that I'd like to get finished. And, want to rework a couple other projects that I've put off.
Have a Happy Easter!
Labels:
accessories,
container,
Easter,
holiday
Tuesday, February 26, 2013
Victorian Hourglass-style Tabistry Corset - Take 2
Been working on the long overdue Tabistry Corset Tutorial, but got distracted by an idea to try shaping a new corset with something like gussets, or inserts. I promise, I am trying to get the tutorial done. Hey, at least this way it may come with another pattern option. :)
Not sure why I keep trying new styles of corsets/bodices. It's just a fun challenge for me. And, I like wearing them. (Kinda like a portable hug.) ;) I remember someone posted that essentially there isn't much difference in corsets and that all can tab corsets will look the same. I think that's a bunch of poo. And, I'd like to thumb my nose at that comment. On my previous corsets I've posted about, I'd always shaped the panels flat and joined to achieve a curve. Doing this, it was hard to alter the corset once it was woven. So, this time I tried just making a bunch of vertical strips, kinda like on the last tabistry top hat. I started joining the strips at the waist being the narrowest part. Then added in what was needed at the bust and hips. So, much easier to alter if you don't get it just right. As you can probably see, this can allow for a more drastic transition in width, too. And, I can add or subtract from the vertical strips to get the right length all the way around. Plus, it gives a bit more support for the bust, now that I can actually shape it more like a cup. Though, this could easily be made into an underbust, as well.
You can't see it, but I've got a removable wooden paintstick "busk" down the front to keep it stiffer. It really wasn't necessary, and I may not actually wear it, but it does prohibit me from slouching. That center decoration in front was just an odd earring I found. I was going to tie a ribbon bow there.
I laced it with two (actually four) laces starting at the center back. I think this is called "bunny ears"? It makes the corset stay tighter at the center to help the hourglass-shape. Oh, and sorry, felt I had to "photoshop" this last pic of the back. I only had bright neon orange shoelaces to try it on with. So, I used some magic to make them a quick red to match. Just wish I had these red laces. When I wear it on the for an upcoming event, I will probably replace this with black ribbon.
I'm really pleased with the way this one turned out. It's a great fit and easier to make/alter. Can't wait to wear this to a steampunk event in March! The only negative side to it was the number of messy looking ends to tie off on the inside, which I could have reduced if I'd put a little forethought into it. Guess I will never be completely happy. I still want to try some other styles of corset in the distant future, but I will try not to let them distract me from getting the tutorial finished. Until then, be can-TAB-ulous!!
Labels:
clothing,
corset/bodice,
costume
Subscribe to:
Posts (Atom)


